Introduction: Throwing away dull drill bits is costly! Portable drill bit sharpeners make sharpening drill bits at home simple, drastically extending drill bit life and reducing tool costs.They are straightforward tools perfect for DIYers and professionals.
This guide will show you how to use a drill bit sharpener, specifically the MR-13A sharpener, to get your bits sharp again. Preparation Before Sharpening (Critical Steps!):
Match Wheel to Bit Material: Ensure the sharpener's grinding wheel is suitable for your drill bit material (e.g., High-Speed Steel - HSS).Mismatched materials cause sharpening failure.
Select the Correct Collet: Choose the collet that matches the diameter of your drill bit. This is essential for secure holding. Have Your Sharpener Ready: Make sure your drill bit sharpener is powered and ready! We'll focus on the MR-13A sharpener, ideal for bits from φ3-φ13mm.
Step-by-Step Drill Bit Sharpening Guide (For MR-13A & Similar Portable Sharpeners):
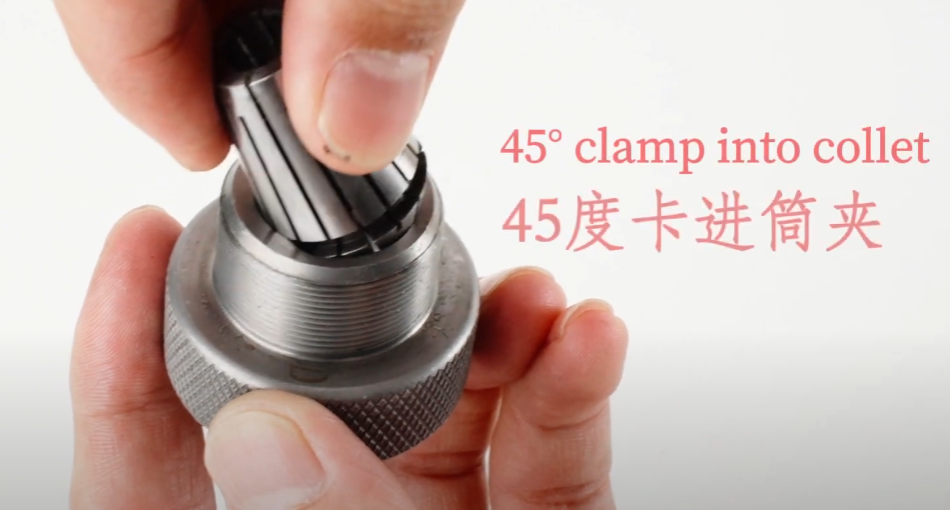
Install Collet & Drill Bit:
Select the correct collet for your bit's diameter.
Insert the collet into the sharpener's grinding head at a 45° angle and lightly tighten the collet nut.
Insert the drill bit fully into the collet.
The Crucial Step: Precise Alignment: If your sharpener has a diameter setting (optional on some models, check manual), adjust it to your bit size.
Insert the assembled grinding head (with bit) into the sharpener spindle.
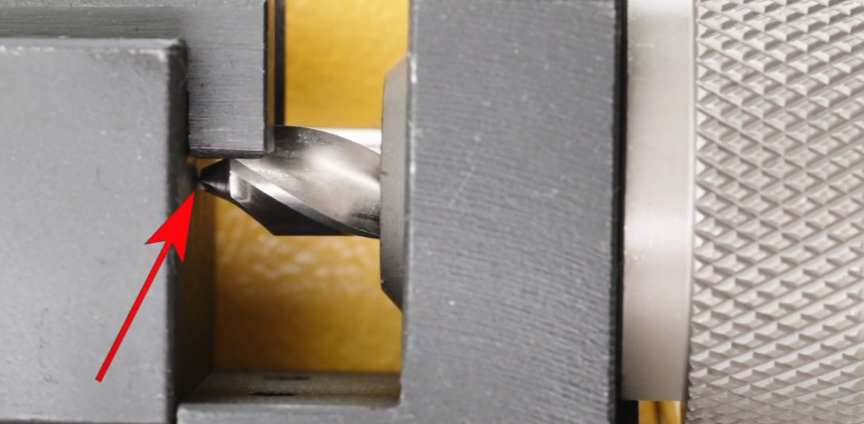
Align the drill bit's flat side (or largest flank) so it is parallel to the side of the grinding head.
Gently touch the very tip of the drill bit to the sharpener's alignment block. Ensure light contact only.
Tighten the grinding head lock screw securely. *This alignment accuracy is critical for successful sharpening!
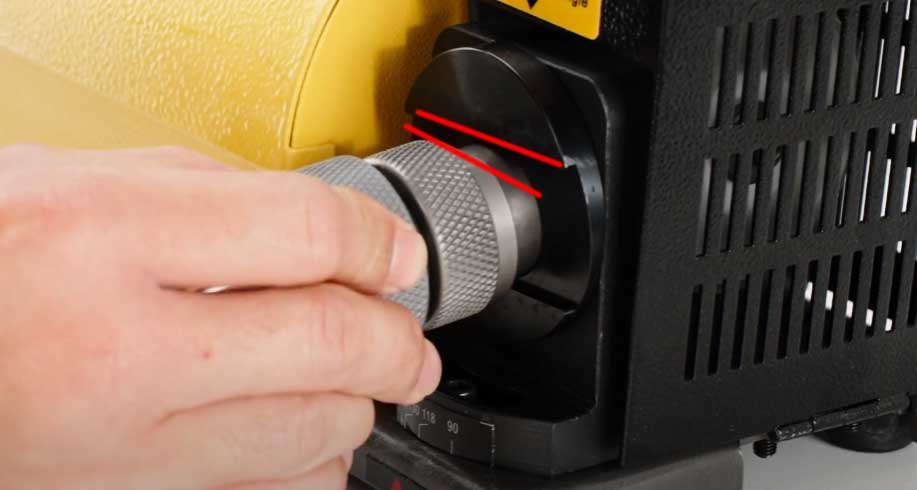
Set the Sharpening Point Angle:
Most modern portable drill bit sharpeners (including the MR-13A) allow adjustment to common point angles (like 90°, 118°, 130°, 135° - 118° being standard for HSS twist bits).
Use the hex key to loosen the point angle adjustment screw.
Rotate the grinding head assembly to set your desired drill point angle.
Tighten the point angle adjustment screw firmly to lock the position.
Start Sharpening the Drill Bit:
Position the adjusted grinding head assembly (with bit) parallel into the grinding zone.
Turn on the sharpener to spin the grinding wheel.
Gently and steadily bring one cutting lip (the main front cutting edge surface) of the bit into contact with the grinding wheel. You should hear a consistent, light grinding sound. Avoid excessive pressure.
After grinding one side, remove the grinding head assembly and rotate the drill bit 180 degrees within the collet.
Repeat the grinding process on the second cutting lip.
Visually inspect the drill point. Ensure both cutting lips and the small clearance facets behind them are ground evenly.
The sharpening is complete when contact with the wheel produces even sound across both lips and the point is symmetrical and sharp.
Finish! Sharp Bit Restored:
Remove the bit and check. Following these steps, your dull drill bit will be resharpened and ready to drill efficiently again.
Conclusion: Sharpening drill bits with a portable sharpener (like the MR-13A) is quick and simple.
The keys are choosing the right collet, achieving precise alignment, and setting the correct point angle. With a little practice, you'll master this valuable skill, significantly saving money on drill bits.
If you don't know how to do it, you can watch our video
Additional Sharpener Options:
Need to sharpen smaller bits or complex angles? Check out the MR-G3 or MR-20Gsharpeners.
Need to sharpen large drill bits (φ10-φ60mm / approx 3/8" to 2-3/8")? The MR-60A or MR-6025is the ideal solution.
Factory users needing high-volume sharpening of drill bits, end mills, ball nose cutters? Explore the new MR-AE30 automatic CNC tool grinder for efficiency and precision.
“MRCM do NOT have any MOQ requirement. We can send a sample model to you for quality check and test within 72hours. It's ALL FREE ! ”


.jpg)
.jpg)
.jpg)


